DNS iPhone and iPad; How to change the DNS servers;- This is How to change the DNS server used by your iPhone and iPad, On occasion, your Internet provider’s slow DNS server may be to blame when webpages take longer than necessary to load on an iPhone or iPad.
How to change your iOS device’s network settings to use a different DNS provider than the one that comes with the Wi-Fi connection settings is suggested by AppleInsider.
Computers can use the Domain Name System (DNS) to locate particular websites and services online. The DNS takes a browser’s requested domain name and delivers an IP address, which the browser uses to connect to the resources it needs to access. In this way, it functions as an online phonebook or directory.
DNS iPhone and iPad; How to change the DNS servers
The DNS server is typically a server run by the Internet Service Provider for the connection and is typically defined to a device automatically when they join to a network. Although there are other different DNS servers available online, this is fine for the majority of people.

DNS iphone
Why alter your DNS servers?
Depending on your Internet Service Provider, the DNS server could not update as frequently to reflect domain name changes, making the site occasionally unreachable and sending users to the incorrect IP address.
Some DNS servers update more often than others, increasing the likelihood that they will have the most recent address information following a change.
If too many queries are sent to the DNS server at once, the reliability and speed of the service may suffer depending on the size of the ISP and the resources it uses to run its DNS server. Larger third-party DNS systems are typically better prepared to handle heavy user volumes.
In situations where an Internet provider’s server is rendered useless by some type of interference, such as during the 2014 Turkish elections when governments temporarily shut down social media, using a trusted DNS service can be helpful.
In order to get around the block, information about Google’s DNS service began to circulate among the populace, but this only lasted a short while.
It is also advisable to use a DNS service you are familiar with when using a public Wi-Fi hotspot because there is no assurance that the DNS provided by the connection will yield accurate results, and there is even a chance that the company managing it may have taken measures to block access to particular websites and services by its users.
Using a third-party DNS has numerous benefits, but it might also lead to certain issues. The use of a centralized DNS service may occasionally cause media access to content delivery networks to lag.
A centralized DNS, for instance, can force a content delivery network for a service to use the same, possibly time-consuming connection path between the server and the user as other users of the same DNS provider. ISP-level DNS services, in contrast, could advise the content delivery network of its location, enabling the usage of a more regional server.
Wi-Fi: Modifying DNS information
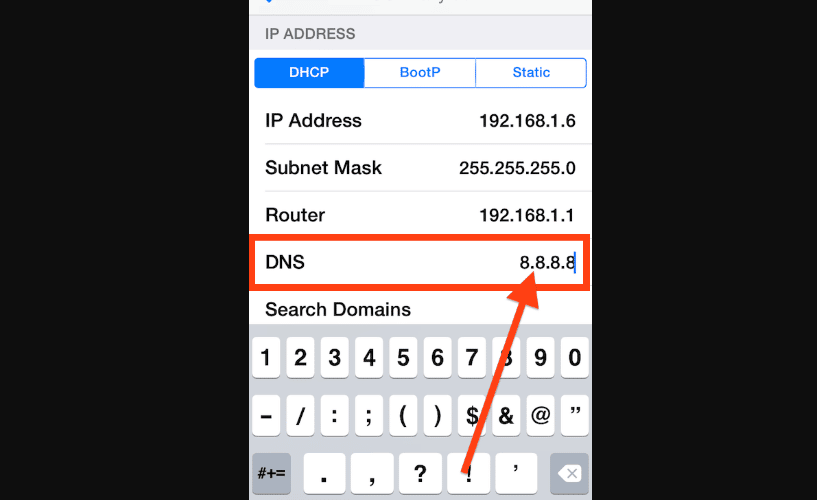
Select Wi-Fi in the Settings app on your iOS device. Scroll down and select Configure DNS after tapping the tiny I button next to the network name where the DNS server information has to be updated.
Change the option from Automatic to Manual at the top. To get rid of the DNS servers, hit the red minus sign in the section below, then select Delete.
If a redundancy option is available, select Add Server, then enter the DNS server IP address you want to use in the newly created empty listing. When done, click Save in the upper-right corner.
The same procedure can be applied to switch servers once more in the future or to return the connection to its default settings. Change the DNS server back to the one the Wi-Fi network recommends by switching from Manual to Automatic.
Notably, this modification won’t affect all Wi-Fi networks; rather, it will only affect one single network. You must make this adjustment on each Wi-Fi network you intend to use a certain DNS server through.
Cellular: Alternatives are needed
In iOS, Apple has not made it possible to modify the DNS information for cellular connections. Users are compelled to connect by default to the DNS server that their carrier has configured.
The cellular DNS can be modified, but only with the help of third-party programs.
One choice is DNS Override, a tool that makes updating Wi-Fi DNS information simple but also has the ability to get over Apple’s prohibition. The program effectively creates a fake Virtual Private Networking (VPN) profile after being activated with an in-app purchase; nonetheless, this profile does allow the app to set the DNS server, including for cellular networks.
An additional choice is to configure a VPN on the iOS device. This allows you to totally avoid your carrier’s DNS server because it establishes a connection with a remote server before accessing the wider Internet.
There are many VPN servers available, both in commercial and free versions, but you may also set up your own if you have a strong connection at home.
Online lists of publicly accessible DNS servers provide you with a large selection of possibilities. Google and Cloudflare provide two significant third-party DNS systems that are also simple to learn, both of which offer speed and security enhancements over ISP versions.
The IP addresses for Google’s public DNS are 8.8.8.8 and 8.8.4.4. With 1.0.0.1 serving as a backup, Cloudflare’s version is stored at 1.1.1.1 in cooperation with APNIC.
The best course of action is to try to change the DNS on the router itself if you have access to your home network’s router and want to update it for all of your devices. Any device connecting to the Wi-Fi network with the DNS set to automatic will utilize the new information after this modification is made.

